
Home : 32mm : Tools : Boring : Jigs :
32mm Drill Press Jig
by Ken Kubiak (1999)
I'm a hobbyist cabinetmaker using the 32mm system to make kitchen cabinets, bookcases, and wardrobes. I have limited space and a limited tool budget. I find that the 32mm system allows me to concentrate on functional design, and that the tool requirements are actually less than for traditional cabinetry and joinery. The basic tools I use are a table saw (Delta contractor's saw), a home-built crosscut sled, a Freud edge bander, the Veritas® 32 jig with a hand drill, and a Jet 10" drill press.
I'm a hobbyist cabinetmaker using the 32mm system to make kitchen cabinets, bookcases, and wardrobes. I have limited space and a limited tool budget. I find that the 32mm system allows me to concentrate on functional design, and that the tool requirements are actually less than for traditional cabinetry and joinery. The basic tools I use are a table saw (Delta contractor's saw), a home-built crosscut sled, a Freud edge bander, the Veritas® 32 jig with a hand drill, and a Jet 10" drill press.
The Veritas jig handles system lines well enough. It's quite tedious, but for my volume it works fine. What it lacks in speed it makes up for in versatility. I don't have to drill every hole; typically I drill every other for a less shot-gunned look. I can also stop drilling a few inches before every fixed horizontal member for a more custom look.
So far, I've also been using the Veritas jig for assembly holes in the vertical panels. I use system holes for assembly and add in some 8mm holes for dowels. The Veritas jig is more difficult to align accurately near the edge of the board, so beginning with my next project, I will use the jig described here for assembly holes. This has the added flexibility of assembly holes not necessarily being on the system grid.
The drill press table I describe here is used for the larger-bore (>10mm) holes which can not be accomplished with the Veritas jig. The size of these bits requires a stationary drill press for accuracy and safety. There are plenty of small drill presses on the market which fit the bill, except that the stages are not suitable for supporting panels.
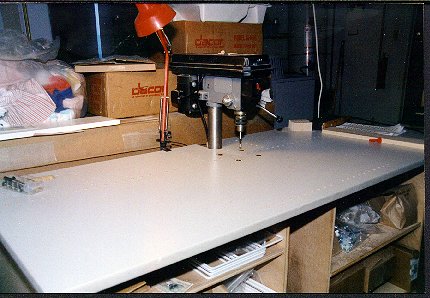
The Drill Press Table
The drill press table consists of a 30" by 72" laminate table top (recycled workstation table) mounted on a couple of base cabinets. The drill press base sits on a shelf under the table. Holes are drilled in the table top for mounting fences and stops.
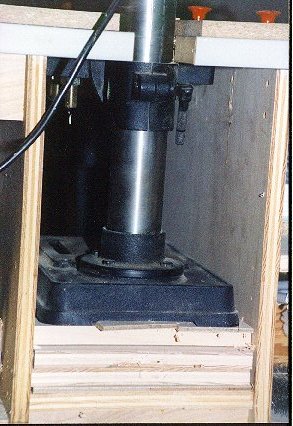
The drill press sits on a fixed shelf attached between the two cabinets under the table. The shelf is just wide enough to accomodate the drill press in order to mimimize sag of both the shelf and the table top above. I've found that I need to adjust the height of the drill press to accomodate different shaft lengths on drill bits. Unlike bits for line-boring machines, there does not seem to be a standard shaft length for bits designed for drill presses. Rather than have an adjustable shelf, I built a fixed shelf at the lowest level I'd want and then use blocks to adjust the height from there.
I wanted to make sure that the drill press was easy to realign after adjusting the height, and also that it didn't sway around relative to the table top. The drill press I have, a Jet 10", has a sturdier-than-average stage. I bolted this stage to the underside of the table, recessing the bolt heads on the top. This has worked very well. To adjust the height, I loosen the stage clamp, add or remove blocks, and tighten it back down. I usually take the head off the drill press when doing this to avoid torquing the stage or my back too much. Realignment simply involves spinning the head until the bit aligns with an index hole in the table top.
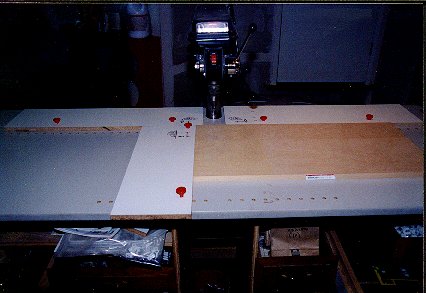
The Fences
The fence system is based on the fact that once we have decided on a particular 32mm system or style or choice of hardware, there are only a few different offsets from the 32mm grid that we need to be concerned with. These are dictated by the style or the hardware specs.
For example, one of the holes for assembly will always be 37mm (or 56 for inset style) from the front edge of the side or top panel. The remaining assembly holes will be some multiple of 32mm in addition to that offset. Similarly, most hinges are mounted centered on the system holes. Once we determine the distance from the first system hole to the bottom of the cabinet, we can determine the distance to the first possible site for a hinge cup. All other possibilities are a multiple of 32 from this point.
Since we use the same offsets over and over, it makes sense to develop a fence and stops which are easily set to these measurements, or any multiple of 32mm away. Doing so will increase accuracy because no measurement is ever involved. It turns out that building such a fence system is also easier than building one that is infinitely adjustable.
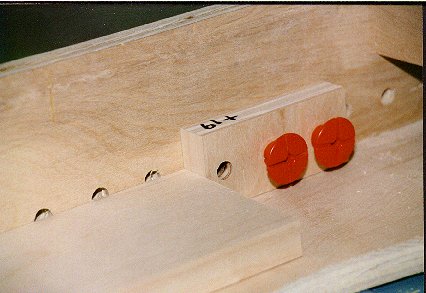
The fence system consists of a few lines of 10mm holes drilled into the top of the table. One line goes left to right and includes the index hole immediately under the drill bit. This line can be used to set stop blocks. Four short lines, two on each side of the drill press, extend back from and perpendicular to the first line. These are for mounting the main fence. Another line is parallel to the first, close to the front edge. Using this row in conjunction with the first, it is possible to set up a fence perpendicular to the main fence.
The fences themselves are just boards with 10mm holes drilled in them at some fixed distance from the edge. These distances are dependent on our system parameters. I drill the holes in the fences using the Veritas jig, which has a gauge for setting the distance from the hole to the edge of the board. The fences are attached to the table with 10mm plastic expanding pegs. The ones I use are part of a children's construction toy called Brio MEC. You can buy the nails separately from the rest of the toy, and they work perfectly.
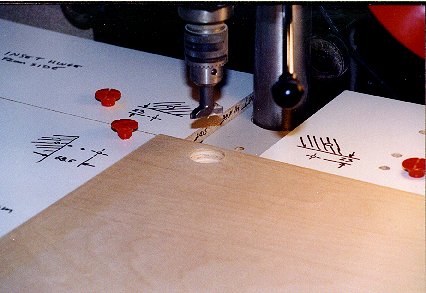
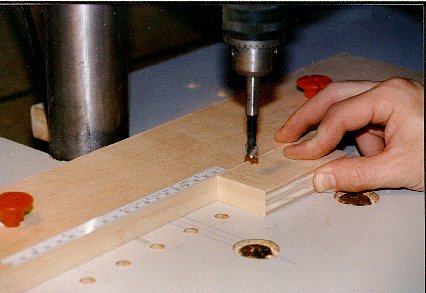
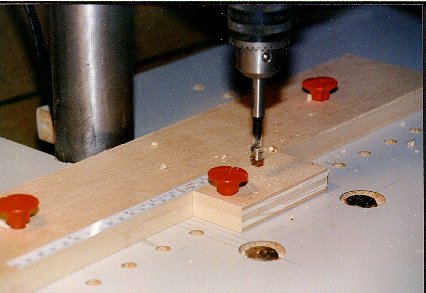
As an example of the fences at work, here is a the set-up for drilling hinge cups. The main fence is split to make room for the drill press stand. The side of the door is against that fence. A secondary perpendicular fence is set up to index the bottom/top of the door. The distance from the holes in the fence to the edge of the fence plus the distance from the edge of the panel to the center of the hole being drilled must add up to some multiple of 32mm. For example, in this case, the cup is being drilled 68.5mm from the bottom of the door. The next highest multiple of 32mm is 96mm. So the hole in the fence is placed at 96-68.5=27.5mm. It gets pretty confusing if you have to remember that you need a 27.5mm offset fence to drill holes 68.5mm from the bottom of the board. Instead, I just label this fence with the style and usage, "Inset style, hinge cup from bottom" and draw a little picture on the fence itself which tells me which hole to peg it into.
The same setup works well for drilling Rafix holes in base cabinets, where it's advisable to have a third connector near the middle of the panel. Also, with the perpendicular fence, you don't need to rely on balanced panels since even the rear Rafix connector can be drilled relative to the front edge of the panel.
For example, one of the holes for assembly will always be 37mm (or 56 for inset style) from the front edge of the side or top panel. The remaining assembly holes will be some multiple of 32mm in addition to that offset. Similarly, most hinges are mounted centered on the system holes. Once we determine the distance from the first system hole to the bottom of the cabinet, we can determine the distance to the first possible site for a hinge cup. All other possibilities are a multiple of 32 from this point.
Since we use the same offsets over and over, it makes sense to develop a fence and stops which are easily set to these measurements, or any multiple of 32mm away. Doing so will increase accuracy because no measurement is ever involved. It turns out that building such a fence system is also easier than building one that is infinitely adjustable.
The fence system consists of a few lines of 10mm holes drilled into the top of the table. One line goes left to right and includes the index hole immediately under the drill bit. This line can be used to set stop blocks. Four short lines, two on each side of the drill press, extend back from and perpendicular to the first line. These are for mounting the main fence. Another line is parallel to the first, close to the front edge. Using this row in conjunction with the first, it is possible to set up a fence perpendicular to the main fence.
The fences themselves are just boards with 10mm holes drilled in them at some fixed distance from the edge. These distances are dependent on our system parameters. I drill the holes in the fences using the Veritas jig, which has a gauge for setting the distance from the hole to the edge of the board. The fences are attached to the table with 10mm plastic expanding pegs. The ones I use are part of a children's construction toy called Brio MEC. You can buy the nails separately from the rest of the toy, and they work perfectly.
As an example of the fences at work, here is a the set-up for drilling hinge cups. The main fence is split to make room for the drill press stand. The side of the door is against that fence. A secondary perpendicular fence is set up to index the bottom/top of the door. The distance from the holes in the fence to the edge of the fence plus the distance from the edge of the panel to the center of the hole being drilled must add up to some multiple of 32mm. For example, in this case, the cup is being drilled 68.5mm from the bottom of the door. The next highest multiple of 32mm is 96mm. So the hole in the fence is placed at 96-68.5=27.5mm. It gets pretty confusing if you have to remember that you need a 27.5mm offset fence to drill holes 68.5mm from the bottom of the board. Instead, I just label this fence with the style and usage, "Inset style, hinge cup from bottom" and draw a little picture on the fence itself which tells me which hole to peg it into.
The same setup works well for drilling Rafix holes in base cabinets, where it's advisable to have a third connector near the middle of the panel. Also, with the perpendicular fence, you don't need to rely on balanced panels since even the rear Rafix connector can be drilled relative to the front edge of the panel.
32mm indexed cross-cut sled
I have a similar stop block system on my crosscut sled. I use the drill press jig to a drill stop blocks for each the various offsets required for a style (vertical panel, horizontal panel/shelf, door/drawer face, back). Using a fence with a rule, I drill a hole at the appropriate offset, then slide it over 32mm and peg that hole in to drill a second hole. A row of 10mm holes on the crosscut sled allow the stop block to be set to any multiple of 32 plus this offset. By labeling the stop blocks by their use (e.g., "horizontal panel") and the holes on the sled by number, I can set up any required cut (like a "#30 horizontal shelf") without making any measurments.
Feel free to e-mail me with any questions -- Ken
Feel free to e-mail me with any questions -- Ken