
Home : 32mm : Tools : Cutting :
 Feb 2016: Added a YouTube video showing the pivoting fence in use.
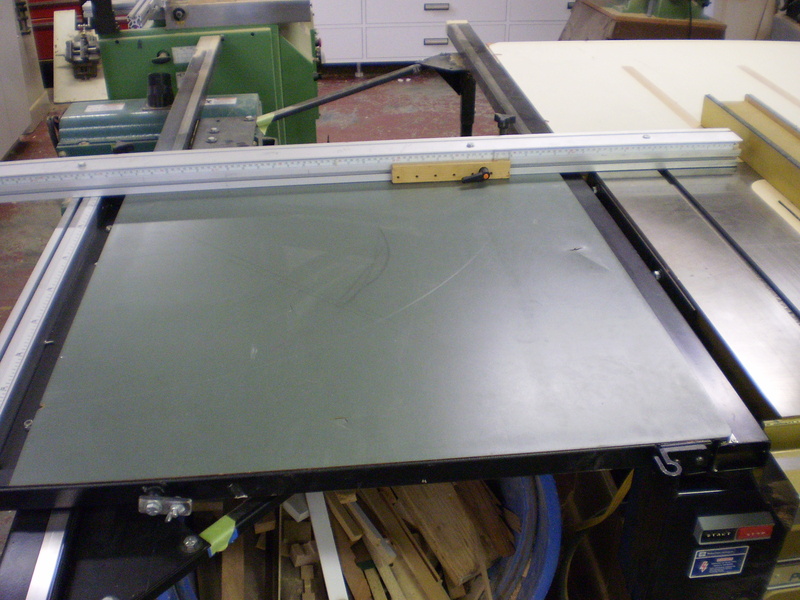
Not being able to afford a sliding table saw I bought the Excalibur sliding table attachment. My review is mixed but I can say it has done wonders for productivity. I can crosscut 4x8 sheets and do all squaring, rough sizing and some final cutting of parts with it.
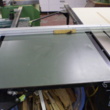
In the pictures, the most obvious thing I have done is to put a laminate top on the table. It came as a welded square tubing, ladder type arrangement which I did not find very practical. I also felt that delicate surfaces were at risk. I ran beads of construction adhesive on the tubing, set the laminate, a flat board and some weights on top.
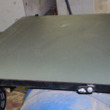 Being able to switch the fence from 90 degrees to parallel (i.e. out of the way for ripping) was one of the most time saving modifications I did. Almost all cutting with the fence is done at 90 degrees. The stock setup makes setting at 90 degrees relatively easy but you need to remove the fence for ripping and I didn't trust the repeatable accuracy of the stop and clamp setup. My solution was to add a fence pivot/mounting bracket to the back outboard side of the table (arrow in image).
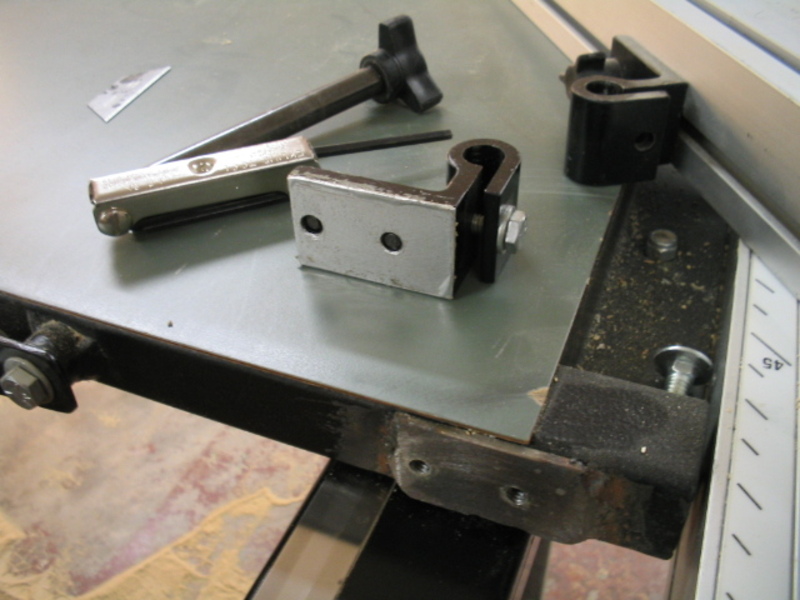
 Instead of using the stop and miter gage clamp to locate/hold the fence at 90 degrees I slid the fence mounted bracket over to the new table mounted bracket and use the miter gage clamping post as an alignment/pivot pin. In addition to locating the fence at 90 degrees, the additional bracket allows the fence to pivot off the left end of the table. Pulling the pin out of the right side brackets allows the fence to pivot out of the way along the outboard side of the table. Dropping the pin in the table trough keeps the fence from swinging about.
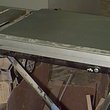
 What I don't like about this table also has a positive side. The table runs on 6 bearings, two sets of 3, that are on top and each side of the left rail. This is a long way away from the sawblade and magnifies any flex in the framework. In other words it is possible to make inaccurate cuts if you put a lot of pressure in any one direction when you are feeding material. One thing that helped stiffen up the framework was fastening the right bar near the back of the outfeed table extension (arrow). The advantage of using the left rail as the main guide rail is that it is the long bar (extending in front of the saw) so you can rip and crosscut without having to walk around the long bar (typical on sliding panel saws).
Setting up the table takes a bit of time but it is well spent if you want repeatable accuracy. The first thing is to get the two tables on the same plane. The next and most important/difficult is lining up the outside bar parallel to the blade. Using one of the special plates that replace the sawblade is probably a good idea. Using a dial indicator is highly recommended but be prepared to not get .001 accuracy. I set my fence as dead parallel to the blade as I could then mounted the dial indicator on the end of the crosscut fence and used the rip fence to set the outside table rail parallel to the blade. Don't worry to much about the inside rail, just that nothing binds. You will notice the piece of blue tape (little red line at front leg). I used tape and pencil marks when making the little tweaking adjustments to get the rail parallel.
The next step is to get the crosscut fence at 90 degrees to the blade. I used the five cut method. You can get square cuts using this method even if your table is not running parallel to the blade, this is not a suggestion but a warning. With the stock fence setup you adjust a wing nut/jamb nut arrangement With my extra bracket setup I used 1-1/2" aluminum tape for shim stock. With the extra bracket you want to start as close to parallel as possible. I ended up welding a piece of 1/8" stock on the table frame for the extra bracket mounting plate where the original mounting plate (other end) is 1/4" stock (I think). The welded up table was not square, not a big deal but check it out. I think I ended up with 6-8 pieces of aluminum tape added to the top of the outboard plate to get me to square.
I bought mine before Excalibur got sold and the old owner came out with the Exactor. I like the Exactor's stainless rails and bearing wipers. I don't know what to think of the latest Excalibur design and wonder if it's worth the extra $550 (see below). I don't know that the inboard rail bearings will make much difference. The brace from the back of the inboard rail to the back of the saw is only useful if you don't have an outfeed extension that you can fasten the back of the rail to.
Links: Excalibur by General ($1400 for the 62" in 2010) , Exactor by Exactor Tools ($860 for the 60" in 2010)
Most of my crosscutting is done on 8' pieces e.g. I rip 8' lengths for my panels, band them and then crosscut to size. When crosscutting I feed from left to right. I cut roughly to size resulting in a right side that is square. For final sizing I use the ripping fence set to my final size. Doing it this way the banded edge always enters the blade first. With things like drawer sides I will set a stop on the crosscut fence and flip the piece over (end to end) for the second cut, still keeping the banding to the blade. How I do the final crosscut is determined by the length to width ratio of the part. Even with pieces that are twice as long as wide I tend to use the rip fence for the final cut.
For square cutting, I always use the fence in the rear position. When the fence is in the rear it's a lot easier to load/unload the material and to position/hold it against the fence and stop. This does require pushing on the work and pulling on the table when feeding the work (especially important w/ negative hook blades) so that the material stays tight to the fence.

Excalibur Sliding Table
 Feb 2016: Added a YouTube video showing the pivoting fence in use.
Not being able to afford a sliding table saw I bought the Excalibur sliding table attachment. My review is mixed but I can say it has done wonders for productivity. I can crosscut 4x8 sheets and do all squaring, rough sizing and some final cutting of parts with it.
In the pictures, the most obvious thing I have done is to put a laminate top on the table. It came as a welded square tubing, ladder type arrangement which I did not find very practical. I also felt that delicate surfaces were at risk. I ran beads of construction adhesive on the tubing, set the laminate, a flat board and some weights on top.
 Being able to switch the fence from 90 degrees to parallel (i.e. out of the way for ripping) was one of the most time saving modifications I did. Almost all cutting with the fence is done at 90 degrees. The stock setup makes setting at 90 degrees relatively easy but you need to remove the fence for ripping and I didn't trust the repeatable accuracy of the stop and clamp setup. My solution was to add a fence pivot/mounting bracket to the back outboard side of the table (arrow in image).
 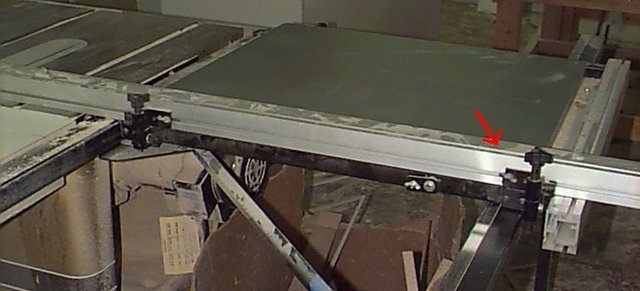 Instead of using the stop and miter gage clamp to locate/hold the fence at 90 degrees I slid the fence mounted bracket over to the new table mounted bracket and use the miter gage clamping post as an alignment/pivot pin. In addition to locating the fence at 90 degrees, the additional bracket allows the fence to pivot off the left end of the table. Pulling the pin out of the right side brackets allows the fence to pivot out of the way along the outboard side of the table. Dropping the pin in the table trough keeps the fence from swinging about.
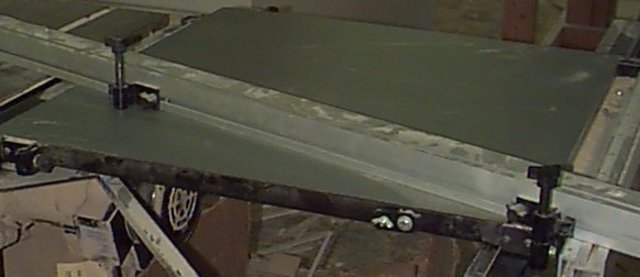
 What I don't like about this table also has a positive side. The table runs on 6 bearings, two sets of 3, that are on top and each side of the left rail. This is a long way away from the sawblade and magnifies any flex in the framework. In other words it is possible to make inaccurate cuts if you put a lot of pressure in any one direction when you are feeding material. One thing that helped stiffen up the framework was fastening the right bar near the back of the outfeed table extension (arrow). The advantage of using the left rail as the main guide rail is that it is the long bar (extending in front of the saw) so you can rip and crosscut without having to walk around the long bar (typical on sliding panel saws).
Setting up the table takes a bit of time but it is well spent if you want repeatable accuracy. The first thing is to get the two tables on the same plane. The next and most important/difficult is lining up the outside bar parallel to the blade. Using one of the special plates that replace the sawblade is probably a good idea. Using a dial indicator is highly recommended but be prepared to not get .001 accuracy. I set my fence as dead parallel to the blade as I could then mounted the dial indicator on the end of the crosscut fence and used the rip fence to set the outside table rail parallel to the blade. Don't worry to much about the inside rail, just that nothing binds. You will notice the piece of blue tape (little red line at front leg). I used tape and pencil marks when making the little tweaking adjustments to get the rail parallel.
The next step is to get the crosscut fence at 90 degrees to the blade. I used the five cut method. You can get square cuts using this method even if your table is not running parallel to the blade, this is not a suggestion but a warning. With the stock fence setup you adjust a wing nut/jamb nut arrangement With my extra bracket setup I used 1-1/2" aluminum tape for shim stock. With the extra bracket you want to start as close to parallel as possible. I ended up welding a piece of 1/8" stock on the table frame for the extra bracket mounting plate where the original mounting plate (other end) is 1/4" stock (I think). The welded up table was not square, not a big deal but check it out. I think I ended up with 6-8 pieces of aluminum tape added to the top of the outboard plate to get me to square.
I bought mine before Excalibur got sold and the old owner came out with the Exactor. I like the Exactor's stainless rails and bearing wipers. I don't know what to think of the latest Excalibur design and wonder if it's worth the extra $550 (see below). I don't know that the inboard rail bearings will make much difference. The brace from the back of the inboard rail to the back of the saw is only useful if you don't have an outfeed extension that you can fasten the back of the rail to.
Links: Excalibur by General ($1400 for the 62" in 2010) , Exactor by Exactor Tools ($860 for the 60" in 2010)
Most of my crosscutting is done on 8' pieces e.g. I rip 8' lengths for my panels, band them and then crosscut to size. When crosscutting I feed from left to right. I cut roughly to size resulting in a right side that is square. For final sizing I use the ripping fence set to my final size. Doing it this way the banded edge always enters the blade first. With things like drawer sides I will set a stop on the crosscut fence and flip the piece over (end to end) for the second cut, still keeping the banding to the blade. How I do the final crosscut is determined by the length to width ratio of the part. Even with pieces that are twice as long as wide I tend to use the rip fence for the final cut.
For square cutting, I always use the fence in the rear position. When the fence is in the rear it's a lot easier to load/unload the material and to position/hold it against the fence and stop. This does require pushing on the work and pulling on the table when feeding the work (especially important w/ negative hook blades) so that the material stays tight to the fence.