
Home : 32mm : Styles :
 When I got hooked with the 32mm system it was from installing some closet kits that used the 32mm system. These kits used shared panels, in other words each closet became a single unit. The same is true for half overlay cabinets. Instead of making 6 cabinets with 12 panels we make one with 7 (...that was written years before Construction picture below).
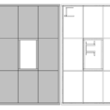
Since we have two "boxes" sharing each panel, our doors/drawers can only cover half the panel (less 1/2 the gap between them). Any combination of "boxes" leaves half a panel showing at each end of our run of cabinets, and at the top and bottom (no box with door/drawer to cover the other half). The result is an 11mm reveal (w/ 19mm panels and 3mm gaps, 9.5+1.5) around the perimeter of a run of cabinets.
All through running (typically vertical) half overlay panels are some multiple of 32mm tall/wide plus panel thickness. All interior (butting to through running) panels, dividers, rails, etc. are some multiple of 32mm tall/wide minus panel thickness. All faces (door, drawer, etc.) are some multiple of 32mm tall/wide minus the desired gap between the faces. All door hinges and drawer front adjusters are some multiple of 32mm apart and can be an equal distance from the top, bottom and sides of the faces.
See also (all on the 32mm Increments page):
Shared Panel Box Heights
Overlay Face Heights
Overlay Hinge Hole Placement

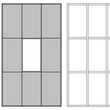
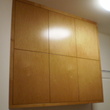
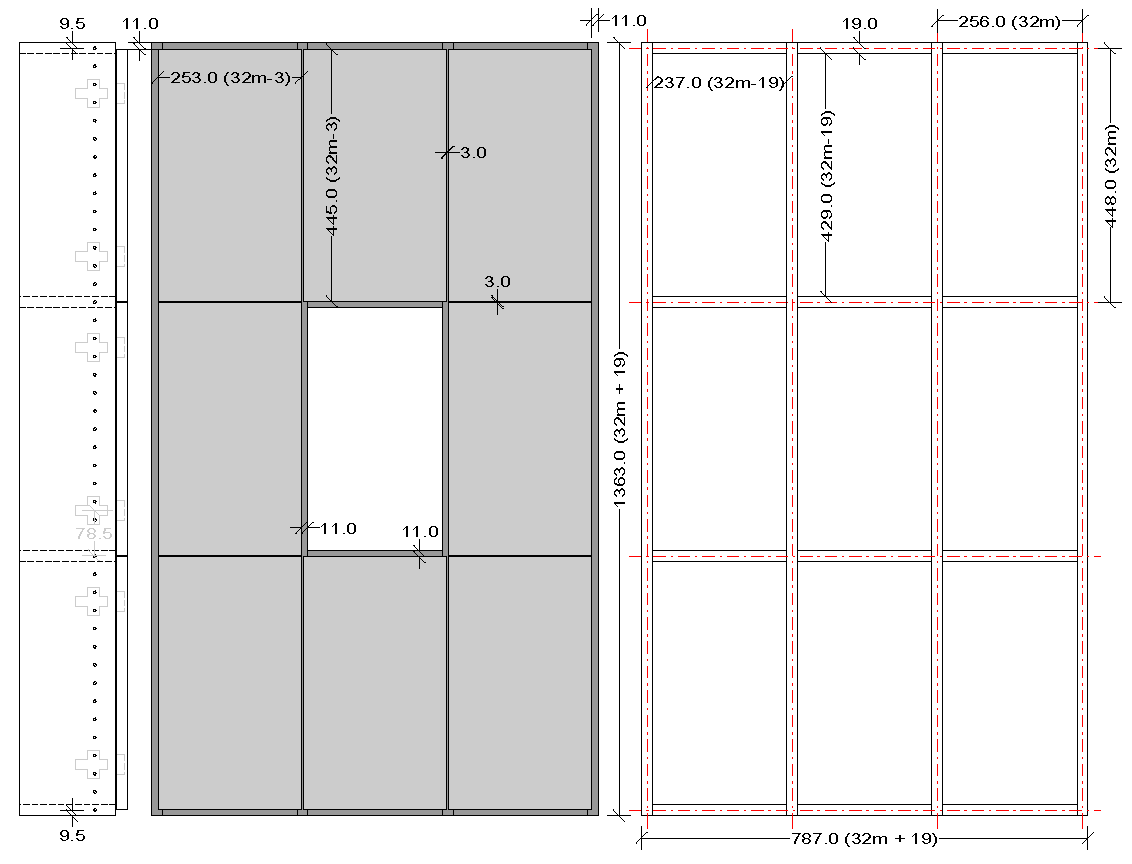
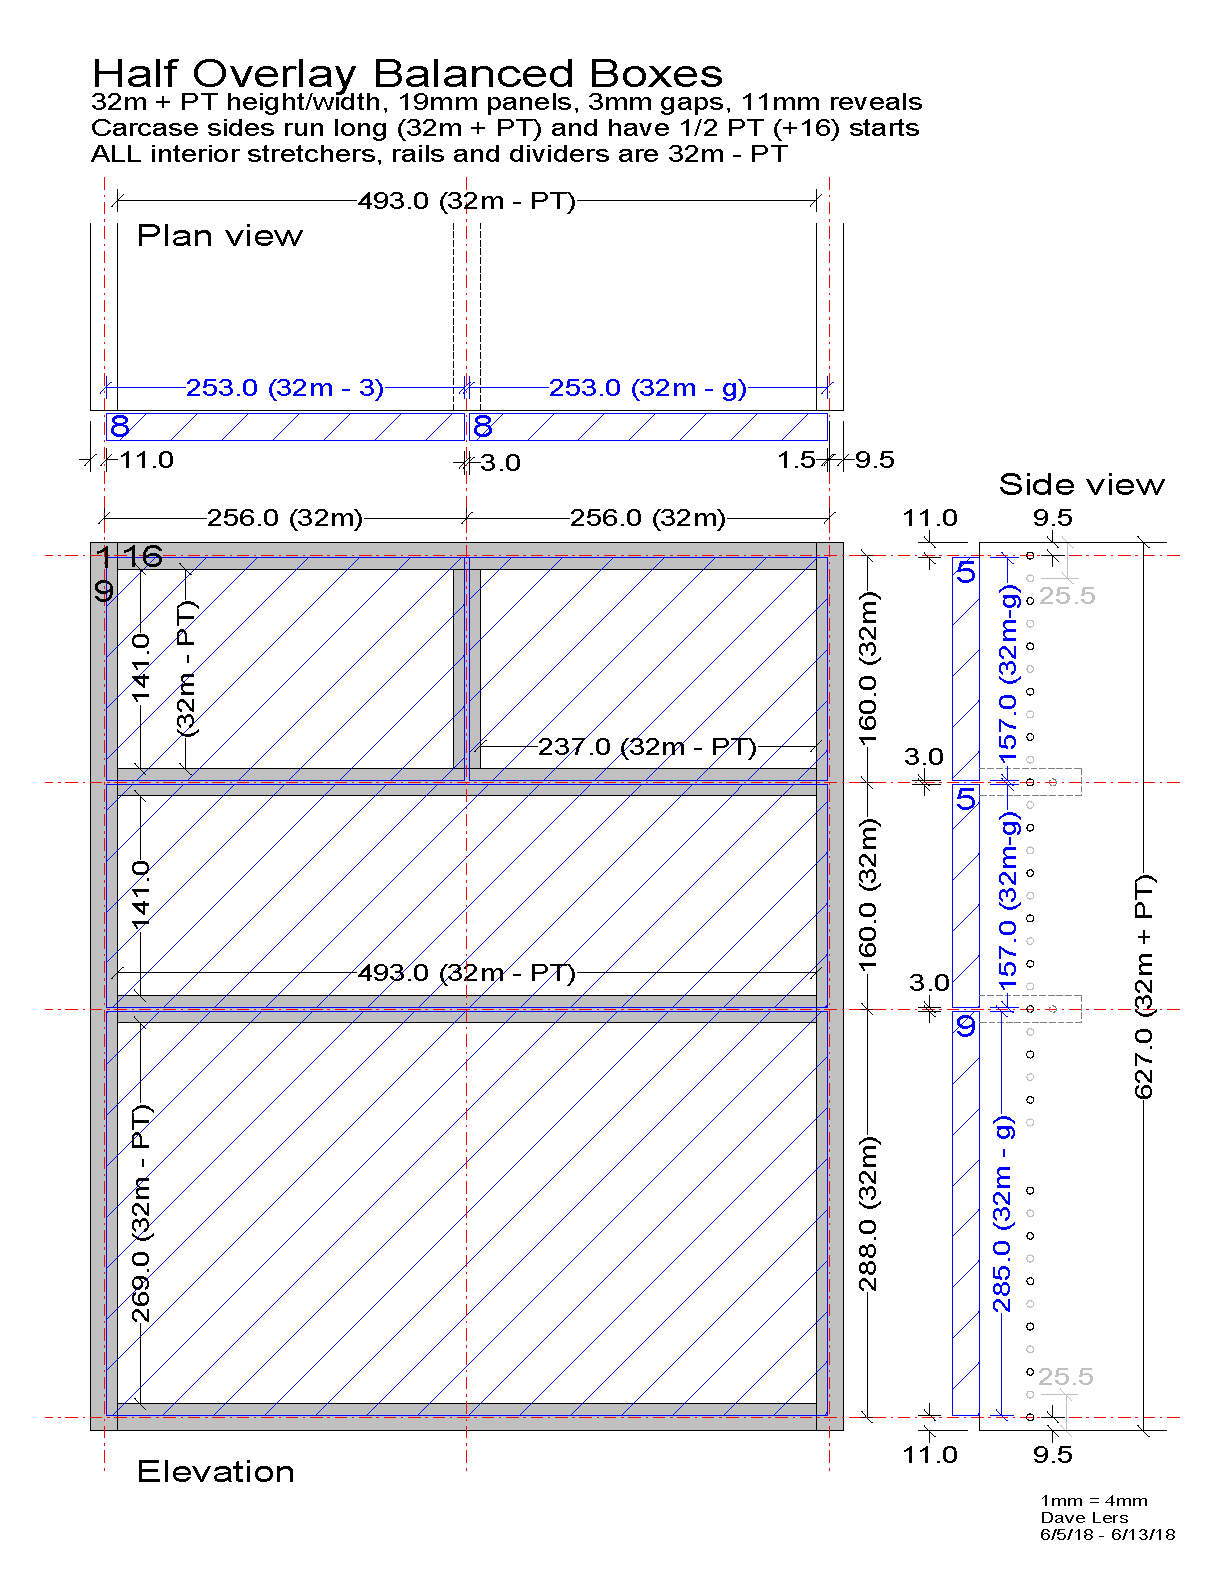
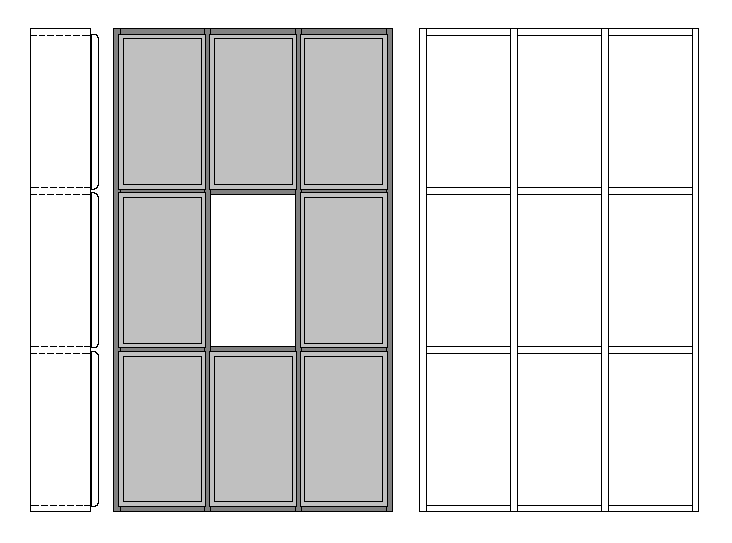
 Modular half overlay boxes are a 32mm multiple (32m) plus panel thickness (PT) tall and wide. Either the box sides or the box top/bottom can be the long/through running panels (32m + PT). Everything else is short/interior panels, stretchers or dividers (32 - PT). The pictured box has the more common 32m + PT sides, the second drawing has the top/bottom running long. However the box is divided, all openings are 32m - PT tall and wide.
[ comment | link | top ]
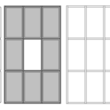
 The drawing shows the four side panels options (long/short, system/shifted) for 19 and 16mm panel thicknesses. Half overlay (and inset) side panel heights are always 32m +/- panel thickness (table). The second drawing shows how changing the gap (3 > 6mm) between the faces affects the top/bottom (and side) reveals.
[ comment | link | top ]
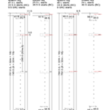
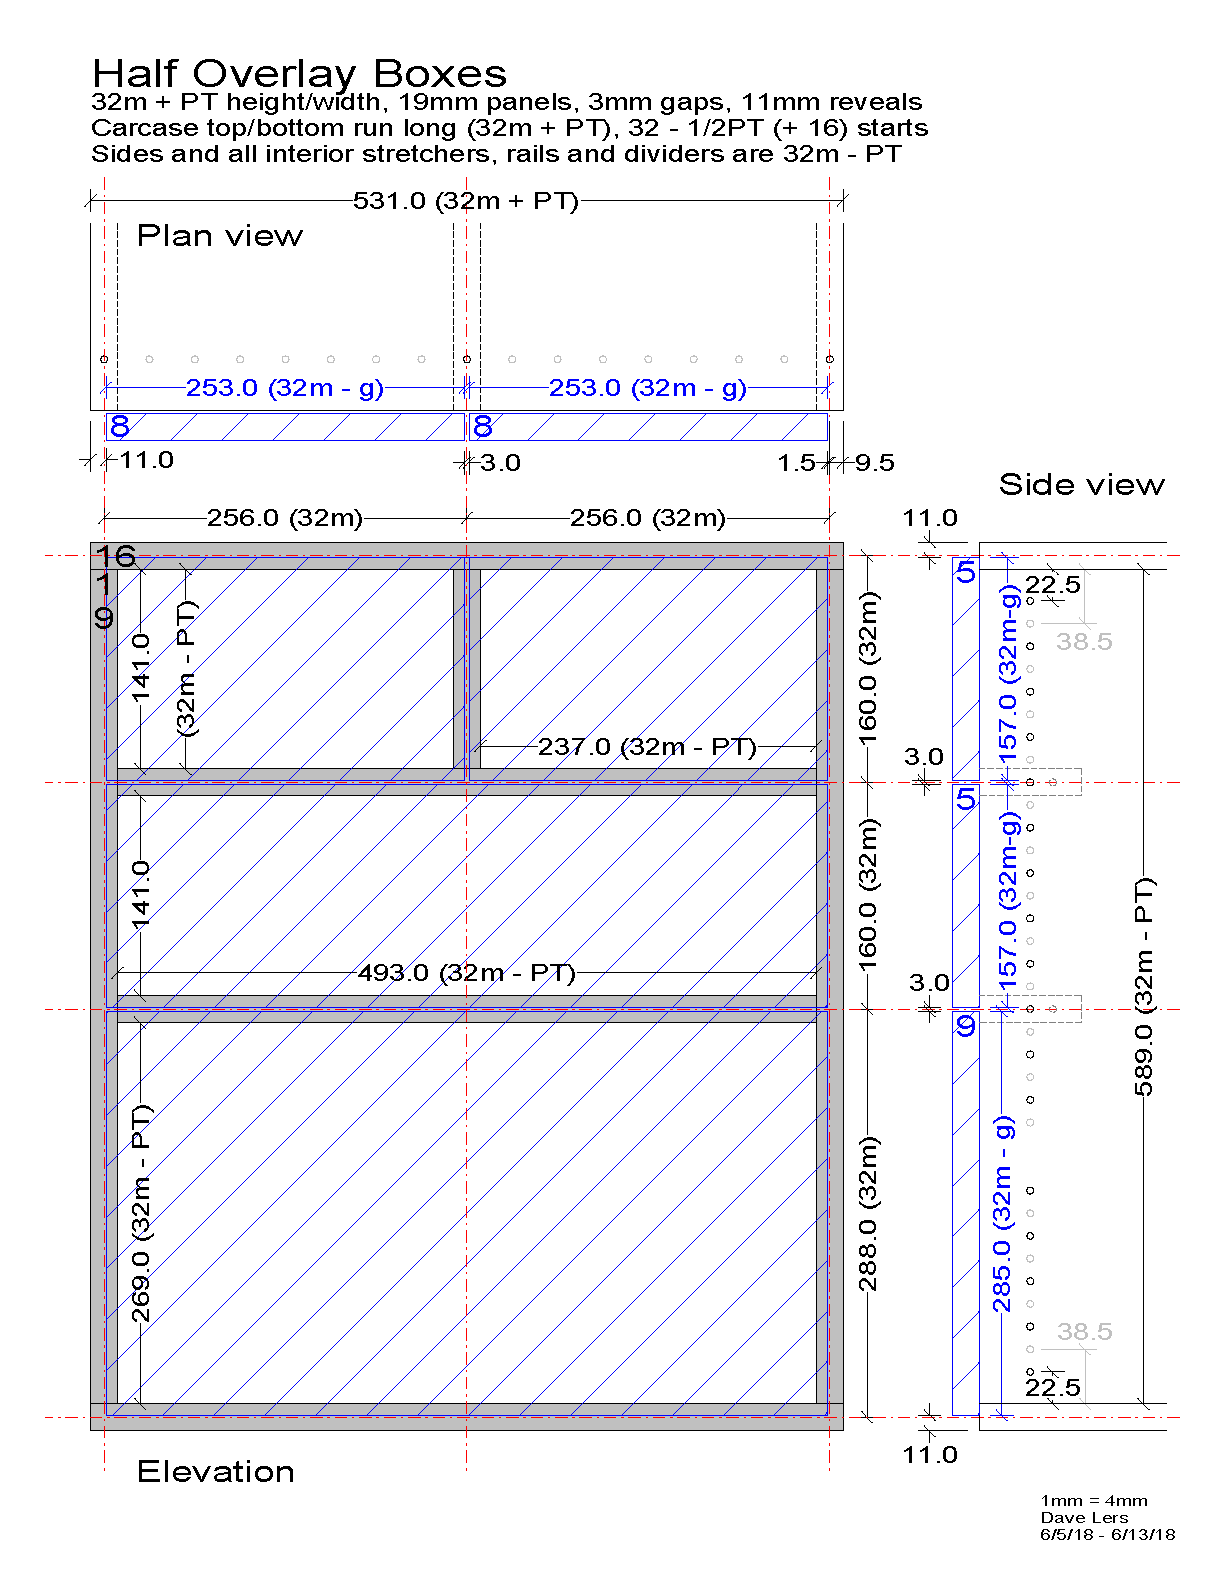
 This is an old drawing of a half-overlay kitchen cross-section. The only holes not on the 32mm grid are the nailers. All boxes are some multiple of 32mm plus panel thickness tall, e.g. 9.5mm start holes top/bottom for 19mm stock. It is drawn with an integral toe-kick, but also works as a 787mm (31") box with feet. The uppers could also be 787mm tall if you don't mind the overall height being 85-1/4" instead of a standard 84". The last holes in the system rows fall in the middle of the box top/bottom (system holes as construction holes - SAC). A system hole drill jig can be used to drill the intermediate holes and the back mounting holes for the drawer slides. While drawn with center indexed wood drawers and bottom mount slides, any slide/box will work. All door and drawer faces are some increment of 32mm tall less reveal.
[ comment | link | top ]
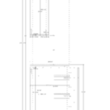
 Using any combination of applied panels and trim it is possible to use half-overlay boxes for inset-flush cabinets. The advantage over inset-flush boxes is that the box doesn't have to match and the applied panels/trim are easy to mount and scribe to the wall.
The applied panels have a built up front edge similar to a built down laminate counter top. The build up needs to be at least the same thickness as the drawer and door face overlay. With 19mm box panels and 3mm reveal, the overlay / minimum buildup is 8mm. With 19mm material for the applied end plus 8mm for the overlay, the front edge will be 27mm. These panels can be screwed to the cabinet from inside the box.
 My preference is 1-1/2" applied panels to match my standard 1-1/2" wide trim at walls and ceiling. Any combination of stock materials can be used for the panel and the buildup. I typically use 19mm/3/4" for the panel and the buildup. The 19mm buildup less the 8mm overlay leaves an 11mm void between the box and the applied panel. My solution is to use Mod-eez keyhole connectors (9mm tall) and special spacer washers (2mm) to mount the panels to the box.
See also: Mixed and Inset
[ page | comments (4) - Wednesday, 26-Aug-2020 | top ]
 I've never tried this, but a thread on the WoodWeb forum gave me the idea. At least to my eye, frameless cabinetry works/looks best when doors have a slightly eased outer edge and tight gaps. Door edge profiles (Ogee, etc.) make me think of face frame cabinetry and large gaps. The drawing is my take on face frame style frameless cabinetry.
The only difference between this drawing and the half overlay one is that the faces are 8mm smaller both vertically and horizontally (8 > 4mm overlays). All face heights (and widths) are still some multiple of 32mm less gap - 11mm in the example. Both half cranked hinges (0mm plate) and straight arm hinges with 9mm plates would work.
[ comment | link | top ]
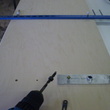
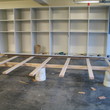 So how do we make/move this 6 box monstrosity? One way is to use RTA hardware designed to work with shared panel construction. Cam assembly is quick enough that it can be done on the job site. The pictured garage storage cabinet was assembled with Minifix cams and bolts. I have a small shop and for me it works a lot better when I can stack/move/haul (everything for this job) pieces and assemble cabinets on site. A side benefit is that a whole run of cabinets is assembled and squared up face down, the back is stapled on and then the whole run is tipped into place. It is easy to level and everything is in a nice straight line.
 It is also possible to assemble as many boxes as possible using other methods and then use RTA hardware to join the boxes. The example was done with 5mm construction holes for confirmats and Minifix bolts. I haven't come up with a good method that works with a single set of construction holes. While the larger confirmat screws can be tapped for M4 Minifix bolts, it would be labor intensive and the thread grip is is probably not strong enough.
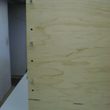
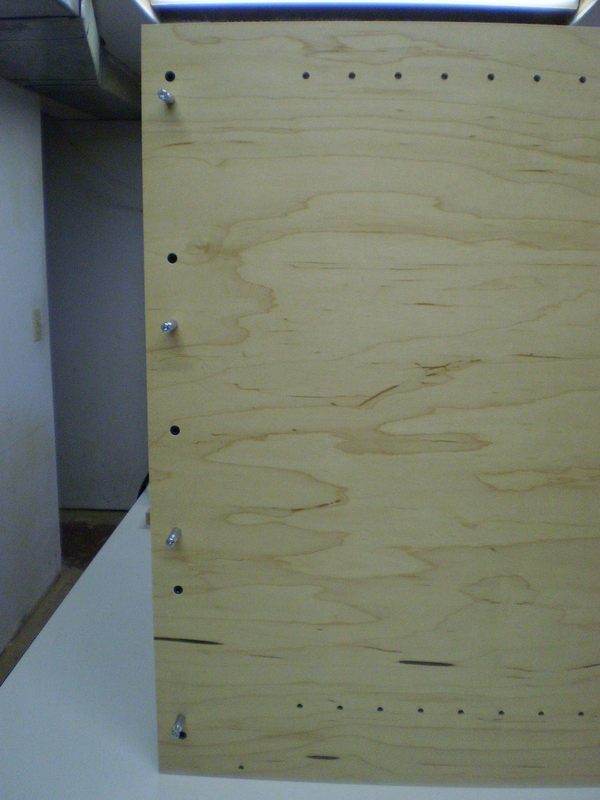
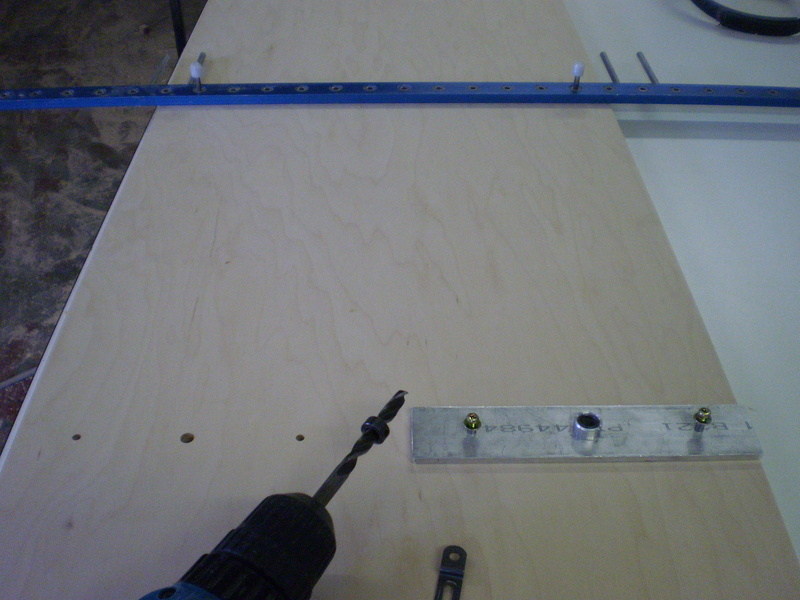
 In most cases it makes the most sense to stick to the standard verticals go through and horizontals fit between the verticals. Having the horizontals go from end-to-end of a run may have an aesthetic advantage, e.g. the bottom of uppers. Unless you are already manually boring holes, or have a machine that can handle mid cross panel drilling, its a more time consuming way to go. Here I did it because it seemed more structurally sound for that particular job (end cleats + center hang mounting). Assembly was 5mm confirmats and 8mm dowels.
[ comment | link | top ]
Half Overlay
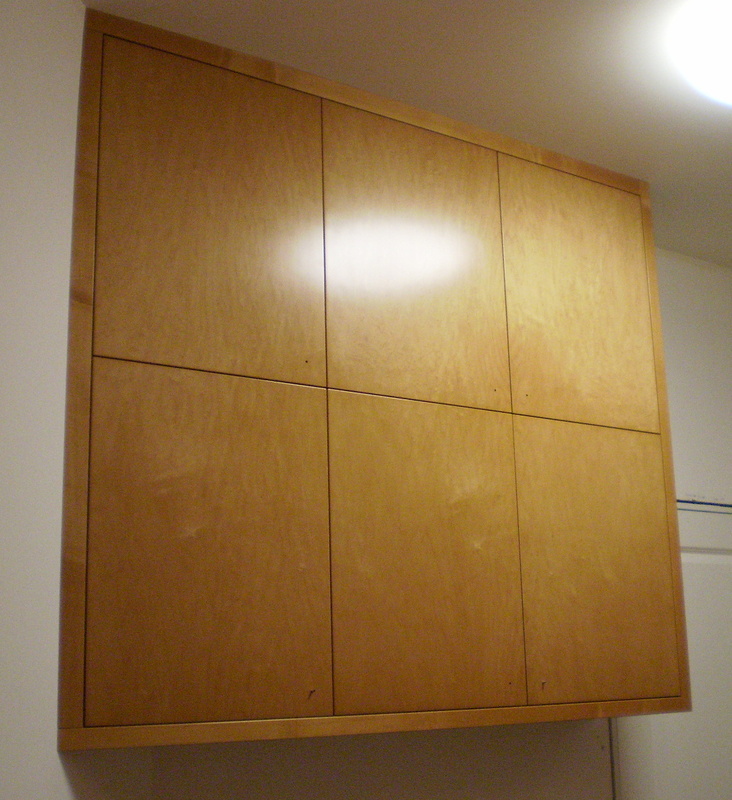
 When I got hooked with the 32mm system it was from installing some closet kits that used the 32mm system. These kits used shared panels, in other words each closet became a single unit. The same is true for half overlay cabinets. Instead of making 6 cabinets with 12 panels we make one with 7 (...that was written years before Construction picture below).
Since we have two "boxes" sharing each panel, our doors/drawers can only cover half the panel (less 1/2 the gap between them). Any combination of "boxes" leaves half a panel showing at each end of our run of cabinets, and at the top and bottom (no box with door/drawer to cover the other half). The result is an 11mm reveal (w/ 19mm panels and 3mm gaps, 9.5+1.5) around the perimeter of a run of cabinets.
All through running (typically vertical) half overlay panels are some multiple of 32mm tall/wide plus panel thickness. All interior (butting to through running) panels, dividers, rails, etc. are some multiple of 32mm tall/wide minus panel thickness. All faces (door, drawer, etc.) are some multiple of 32mm tall/wide minus the desired gap between the faces. All door hinges and drawer front adjusters are some multiple of 32mm apart and can be an equal distance from the top, bottom and sides of the faces.
See also (all on the 32mm Increments page):
Shared Panel Box Heights
Overlay Face Heights
Overlay Hinge Hole Placement
Boxes
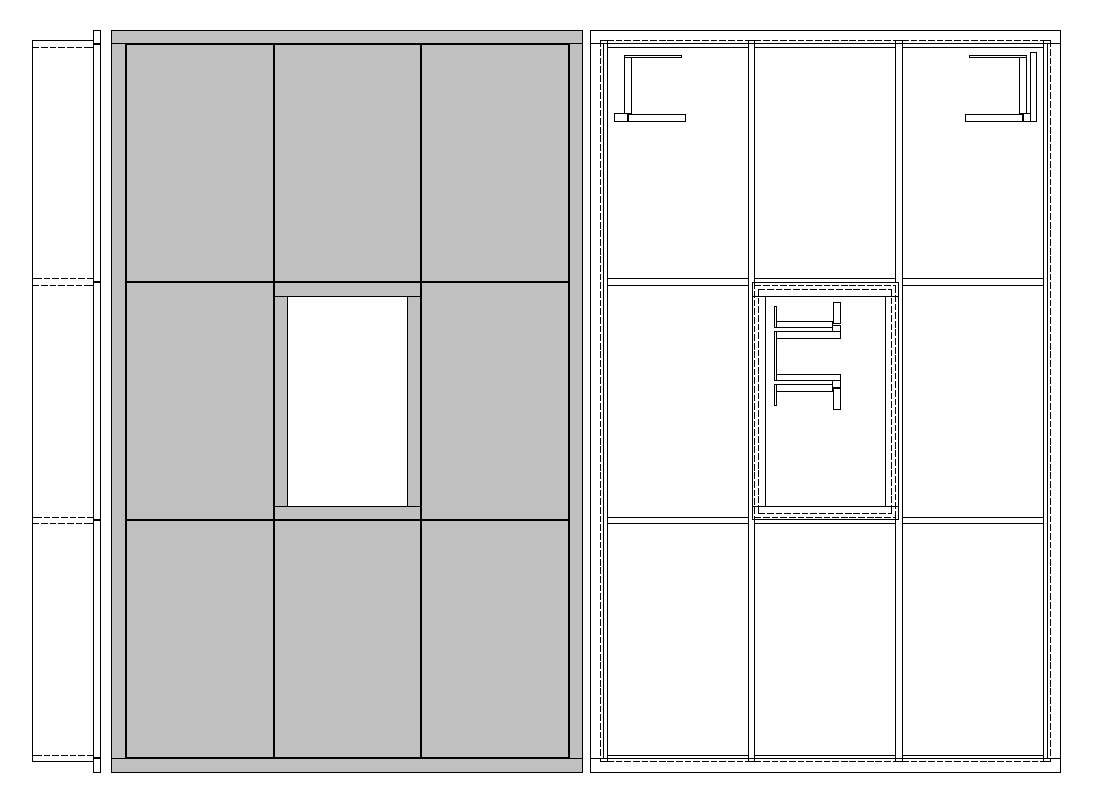
 Modular half overlay boxes are a 32mm multiple (32m) plus panel thickness (PT) tall and wide. Either the box sides or the box top/bottom can be the long/through running panels (32m + PT). Everything else is short/interior panels, stretchers or dividers (32 - PT). The pictured box has the more common 32m + PT sides, the second drawing has the top/bottom running long. However the box is divided, all openings are 32m - PT tall and wide.
[ comment | link | top ]
Side Panels
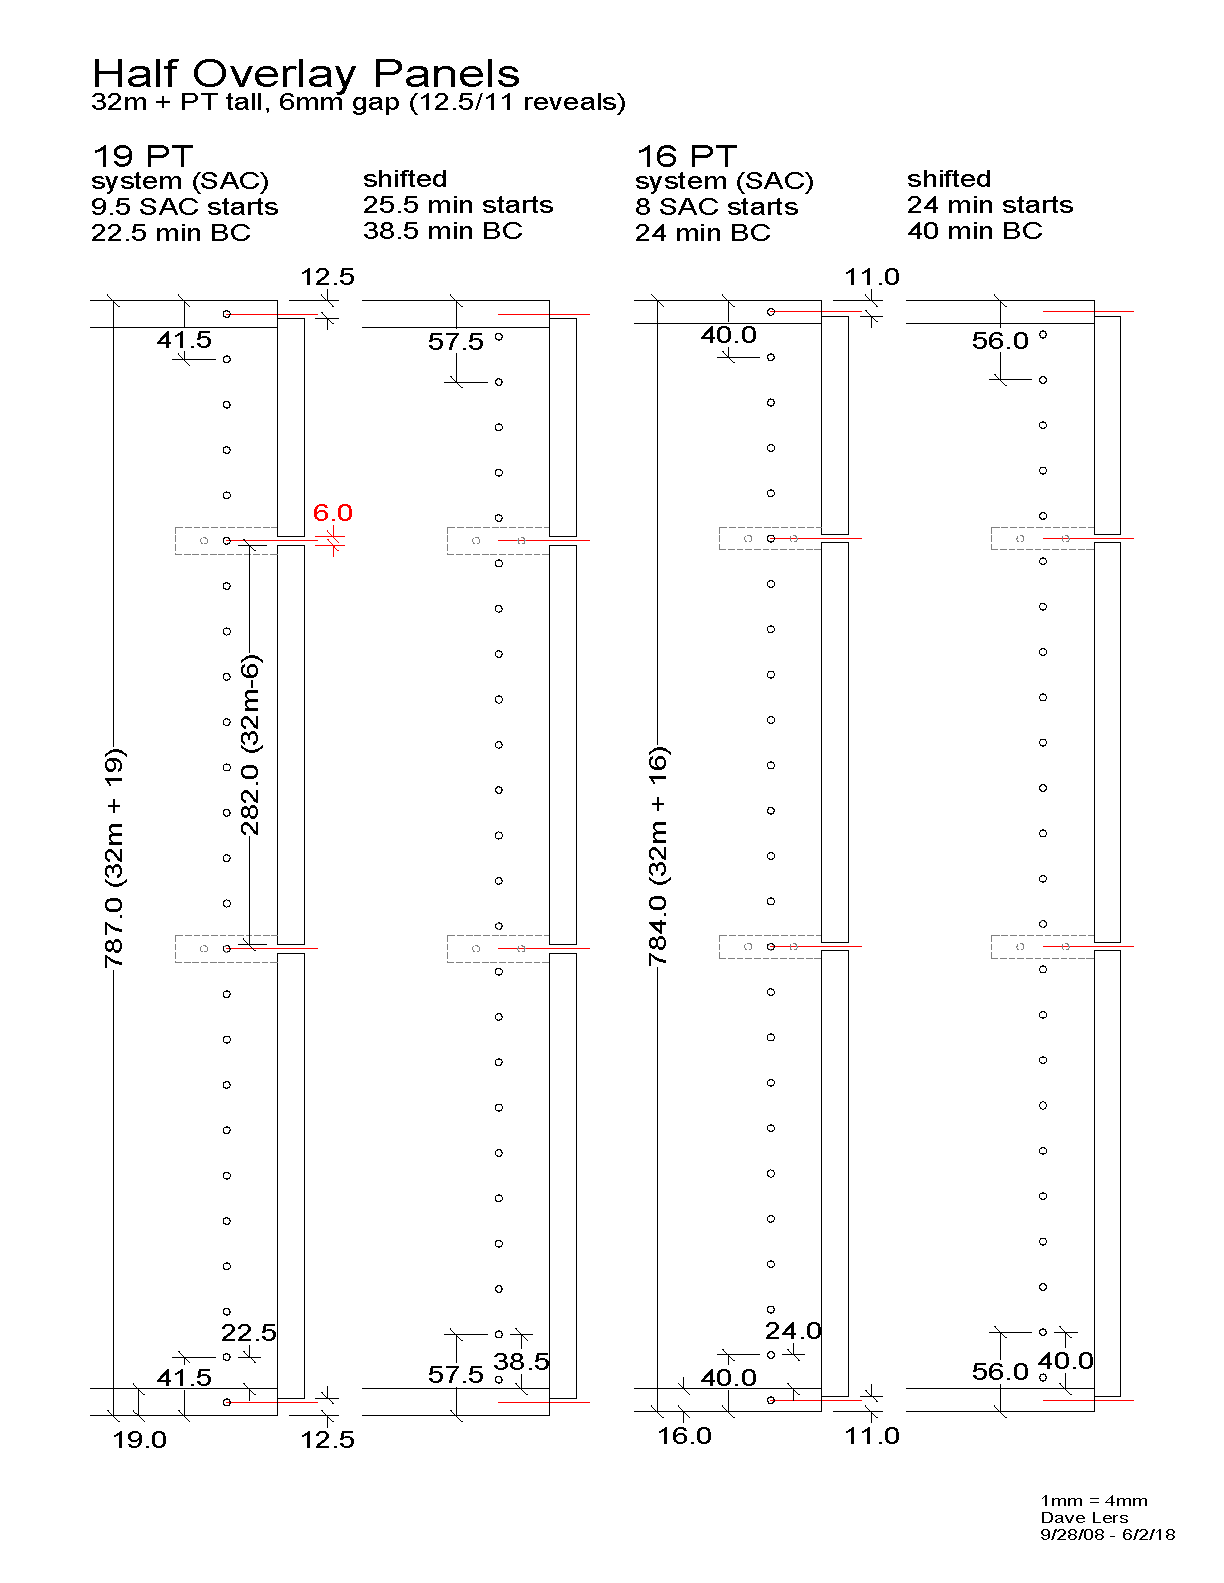
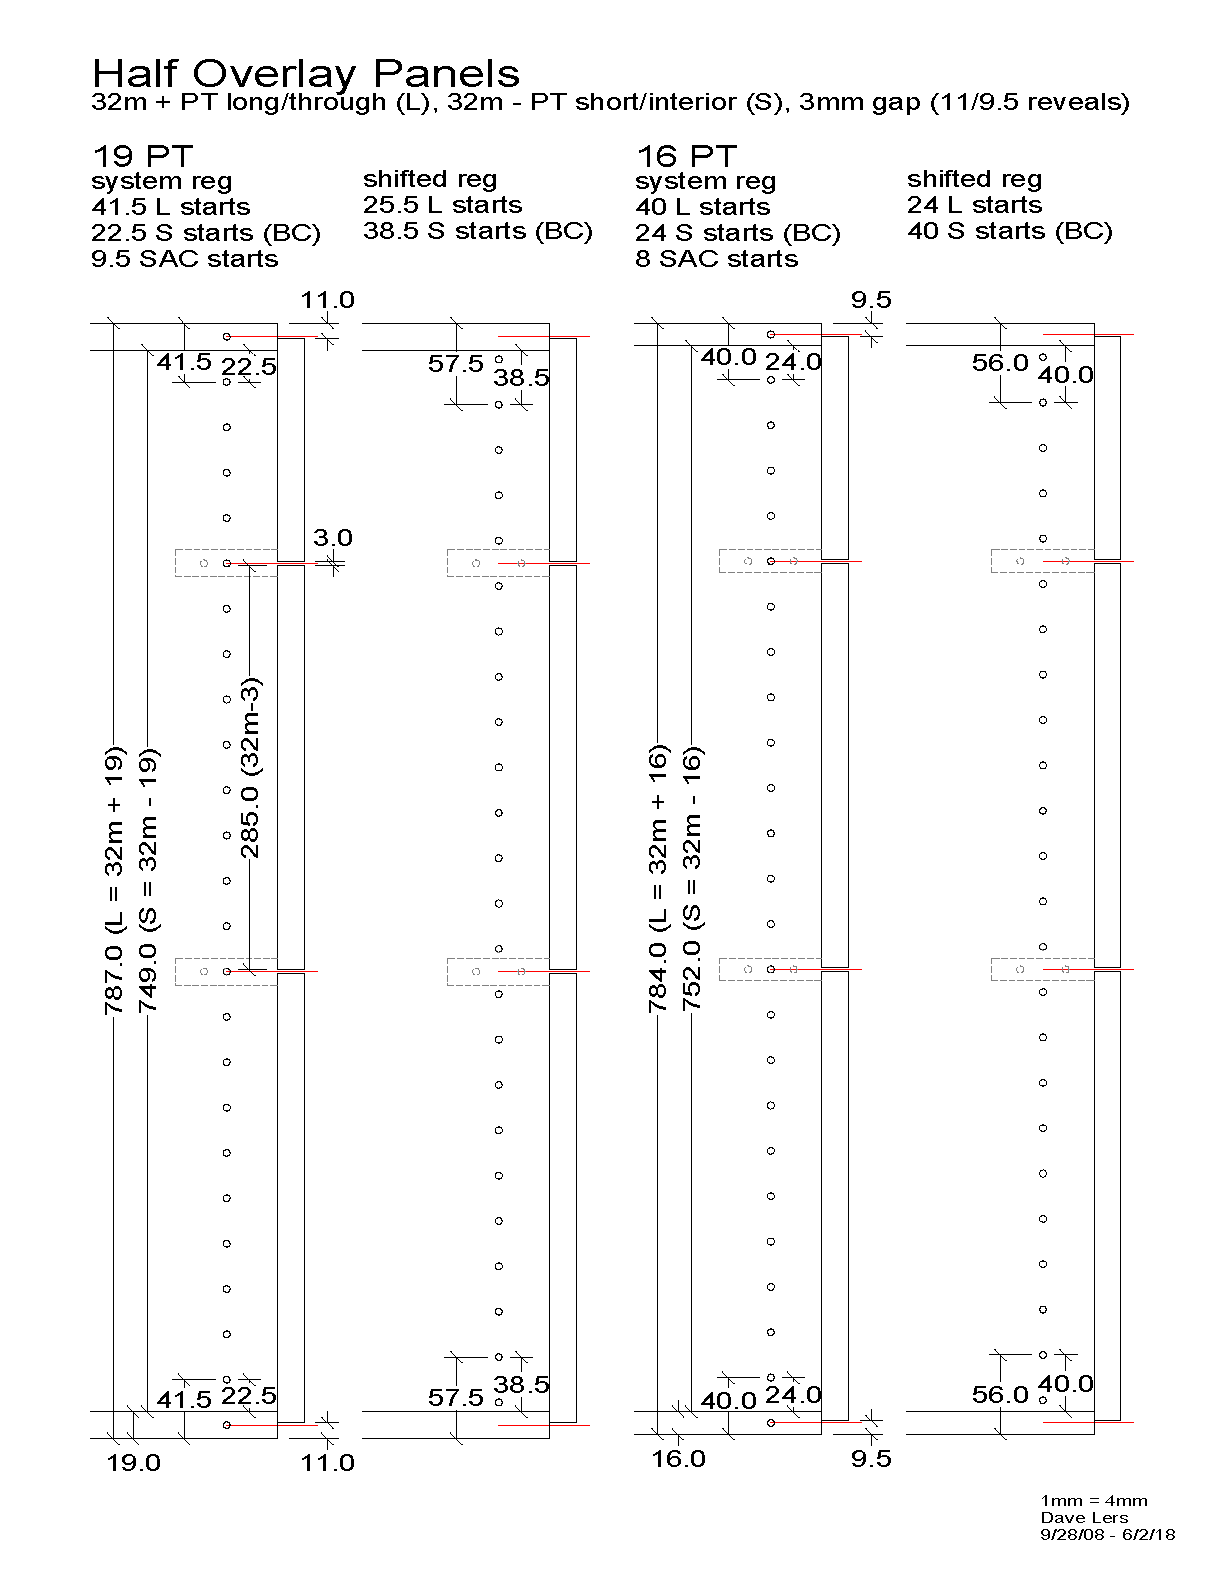 The drawing shows the four side panels options (long/short, system/shifted) for 19 and 16mm panel thicknesses. Half overlay (and inset) side panel heights are always 32m +/- panel thickness (table). The second drawing shows how changing the gap (3 > 6mm) between the faces affects the top/bottom (and side) reveals.
[ comment | link | top ]
Balanced Kitchen
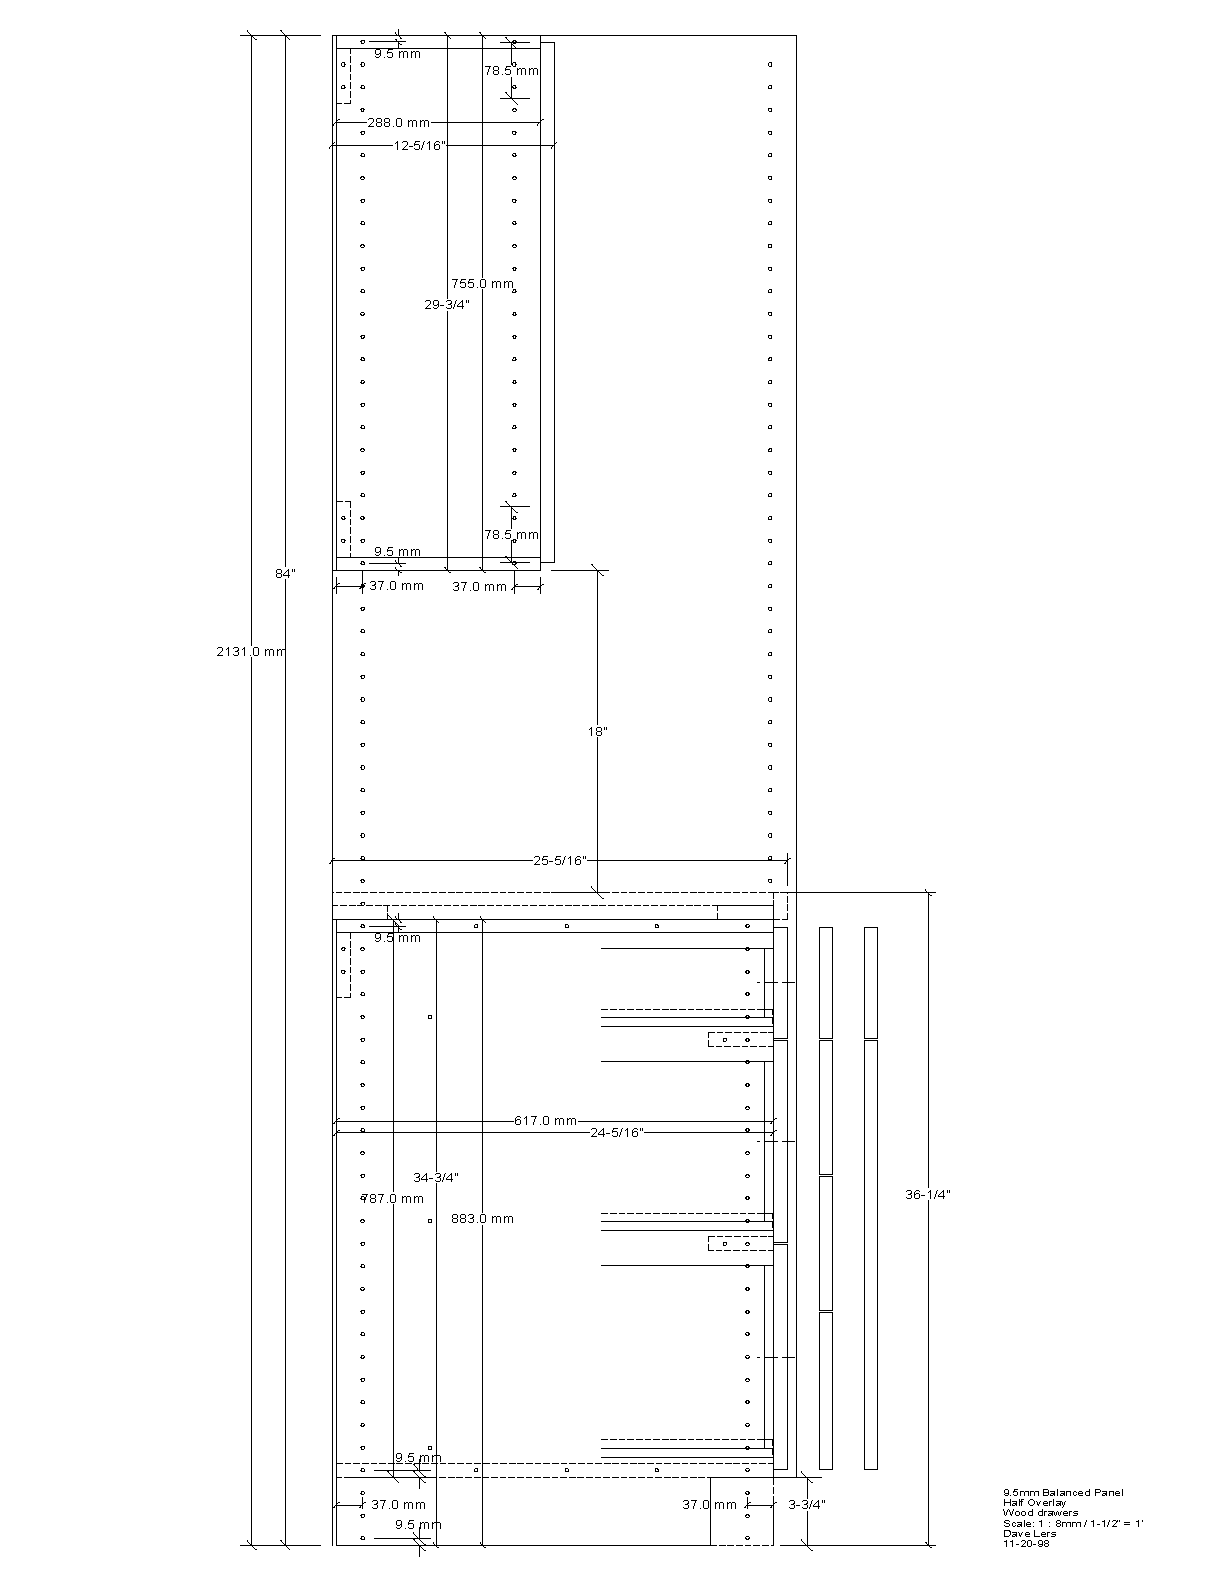 This is an old drawing of a half-overlay kitchen cross-section. The only holes not on the 32mm grid are the nailers. All boxes are some multiple of 32mm plus panel thickness tall, e.g. 9.5mm start holes top/bottom for 19mm stock. It is drawn with an integral toe-kick, but also works as a 787mm (31") box with feet. The uppers could also be 787mm tall if you don't mind the overall height being 85-1/4" instead of a standard 84". The last holes in the system rows fall in the middle of the box top/bottom (system holes as construction holes - SAC). A system hole drill jig can be used to drill the intermediate holes and the back mounting holes for the drawer slides. While drawn with center indexed wood drawers and bottom mount slides, any slide/box will work. All door and drawer faces are some increment of 32mm tall less reveal.
[ comment | link | top ]
Inset-Flush Half-Overlay
 Using any combination of applied panels and trim it is possible to use half-overlay boxes for inset-flush cabinets. The advantage over inset-flush boxes is that the box doesn't have to match and the applied panels/trim are easy to mount and scribe to the wall.
 The applied panels have a built up front edge similar to a built down laminate counter top. The build up needs to be at least the same thickness as the drawer and door face overlay. With 19mm box panels and 3mm reveal, the overlay / minimum buildup is 8mm. With 19mm material for the applied end plus 8mm for the overlay, the front edge will be 27mm. These panels can be screwed to the cabinet from inside the box.
 My preference is 1-1/2" applied panels to match my standard 1-1/2" wide trim at walls and ceiling. Any combination of stock materials can be used for the panel and the buildup. I typically use 19mm/3/4" for the panel and the buildup. The 19mm buildup less the 8mm overlay leaves an 11mm void between the box and the applied panel. My solution is to use Mod-eez keyhole connectors (9mm tall) and special spacer washers (2mm) to mount the panels to the box.
See also: Mixed and Inset
[ page | comments (4) - Wednesday, 26-Aug-2020 | top ]
Increased Gap
 I've never tried this, but a thread on the WoodWeb forum gave me the idea. At least to my eye, frameless cabinetry works/looks best when doors have a slightly eased outer edge and tight gaps. Door edge profiles (Ogee, etc.) make me think of face frame cabinetry and large gaps. The drawing is my take on face frame style frameless cabinetry.
The only difference between this drawing and the half overlay one is that the faces are 8mm smaller both vertically and horizontally (8 > 4mm overlays). All face heights (and widths) are still some multiple of 32mm less gap - 11mm in the example. Both half cranked hinges (0mm plate) and straight arm hinges with 9mm plates would work.
[ comment | link | top ]
Construction
 So how do we make/move this 6 box monstrosity? One way is to use RTA hardware designed to work with shared panel construction. Cam assembly is quick enough that it can be done on the job site. The pictured garage storage cabinet was assembled with Minifix cams and bolts. I have a small shop and for me it works a lot better when I can stack/move/haul (everything for this job) pieces and assemble cabinets on site. A side benefit is that a whole run of cabinets is assembled and squared up face down, the back is stapled on and then the whole run is tipped into place. It is easy to level and everything is in a nice straight line.
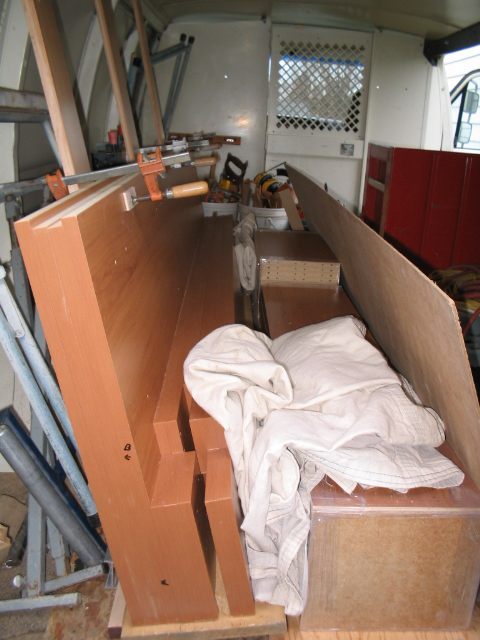
 It is also possible to assemble as many boxes as possible using other methods and then use RTA hardware to join the boxes. The example was done with 5mm construction holes for confirmats and Minifix bolts. I haven't come up with a good method that works with a single set of construction holes. While the larger confirmat screws can be tapped for M4 Minifix bolts, it would be labor intensive and the thread grip is is probably not strong enough.
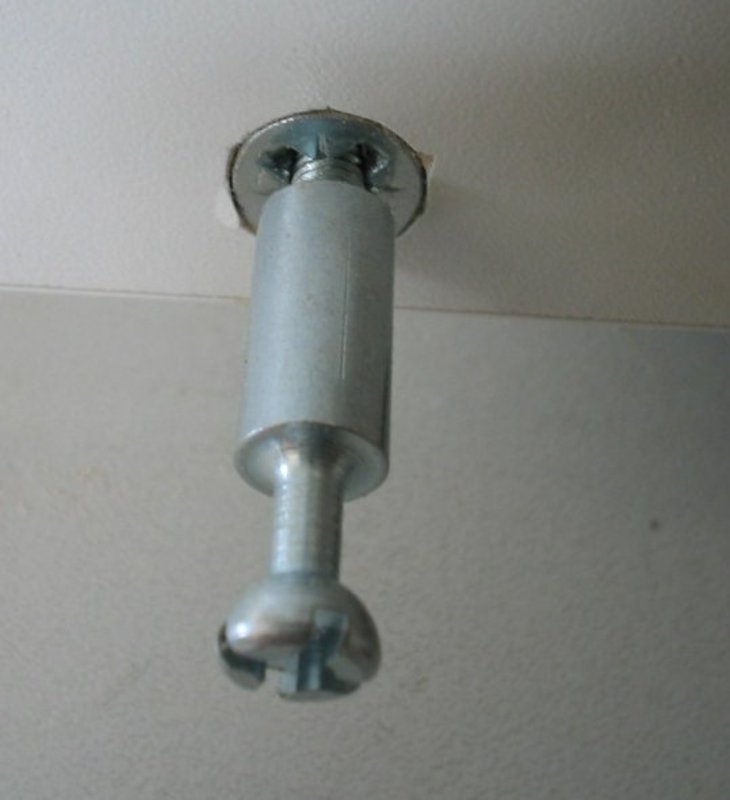
 In most cases it makes the most sense to stick to the standard verticals go through and horizontals fit between the verticals. Having the horizontals go from end-to-end of a run may have an aesthetic advantage, e.g. the bottom of uppers. Unless you are already manually boring holes, or have a machine that can handle mid cross panel drilling, its a more time consuming way to go. Here I did it because it seemed more structurally sound for that particular job (end cleats + center hang mounting). Assembly was 5mm confirmats and 8mm dowels.
[ comment | link | top ]